技術部の小野(@taiki45)です。この記事では簡単なアプリケーション(ブログシステム)の実装を通して、クックパッドで作成・使用しているライブラリのGarageの紹介と Garage を使った RESTful Web API の開発をご紹介したいと思います。
Garage は RESTful Web API を開発するための、 Rails gemified pluginsです。Rails プログラマは Garage を使って Rails を拡張することで素早く Web API を開発することができます。Garage は新しくアプリケーションを開発する場合にも、既存の Rails アプリケーションに組み込んで Web API を実装する場合でも使用できます。Garage はリソースのシリアライズやアクセスコントロールなど Web API の実装に必要な機能をカバーしています。
❯ bundle install
❯ bundle exec rails g rspec:install
# spec/rails_helper.rb-# Dir[Rails.root.join("spec/support/**/*.rb")].each { |f| require f }+Dir[Rails.root.join("spec/support/**/*.rb")].each { |f| require f }# spec/spec_helper.rb-# The settings below are suggested to provide a good initial experience-# with RSpec, but feel free to customize to your heart's content.-=begin
   # These two settings work together to allow you to limit a spec run
   # to individual examples or groups you care about by tagging them with
   # `:focus` metadata. When nothing is tagged with `:focus`, all examples
@@ -81,5 +78,4 @@ RSpec.configure do |config|
   # test failures related to randomization by passing the same `--seed` value
   # as the one that triggered the failure.
   Kernel.srand config.seed
-=end
 end

# spec/support/factory_girl.rb+RSpec.configure do |config|+  config.include FactoryGirl::Syntax::Methods+end
# app/controllers/application_controller.rb++  include Garage::ControllerHelper++  def current_resource_owner+    @current_resource_owner ||= User.find(resource_owner_id) if resource_owner_id+  end
 end
Garage の規約としてここでユーザーが定義すべきものは current_resource_ownerというメソッドです。このメソッドはリクエストされたアクセストークンに紐付いているリソースオーナー情報を使用してアプリケーションのユーザーオブジェクトへ変換することが期待されています。注意する点としては、OAuth2 の client credentials などの grant type で認可したアクセストークンについてはリソースオーナー情報が紐つかないので nil が入っていることがあります。ここで変換したユーザーオブジェクトに対して後述するアクセスコントロールロジックが実行されます。
RSpec example group の中で必要に応じて resource_ownerや scopesを上書き定義することで、リソースオーナーの違いや OAuth2 のスコープの違いを作りだせます。
ついでに細かいところですが、facotry の定義を書き換えておきます。
# spec/factories/users.rb
 FactoryGirl.define do
   factory :user do
-    name "MyString"-email "MyString"+    sequence(:name) {|n| "user#{n}" }+    email { "#{name}@example.com" }
   end
-
 end
最初の request spec は最小限のテストのみ実行するようにします。
# spec/requests/users_spec.rb+require 'rails_helper'++RSpec.describe 'users', type: :request do+ include RequestHelper++ describe 'GET /v1/users' do+ let!(:users) { create_list(:user, 3) }++ it 'returns user resources' do+ get '/v1/users', params, env+ expect(response).to have_http_status(200)+ end+ end+end
テスト用データベースを作成してテスト実行してみます。
❯ RAILS_ENV=test bundle exec rake db:create migrate
❯ bundle exec rspec -fp spec/requests/users_spec.rb

Run options: include {:focus=>true}

All examples were filtered out; ignoring {:focus=>true}
.

Finished in 0.06393 seconds (files took 1.67 seconds to load)
1 example, 0 failures
# spec/requests/users_spec.rb
  describe 'PUT /v1/users/:user_id'do
    before { params[:name] = 'bob' }

    context 'with owned resource'do
      let!(:user) { resource_owner }

      it 'updates user resource'do
        put "/v1/users/#{user.id}", params, env
        expect(response).to have_http_status(204)
      endend

    context 'without owned resource'do
      let!(:other) { create(:user, name: 'raymonde') }

      it 'returns 403'do
        put "/v1/users/#{other.id}", params, env
        expect(response).to have_http_status(403)
      endendend
テストが失敗することを確かめます。
❯ bundle exec rspec spec/requests/users_spec.rb:24

users
  PUT /v1/users/:user_id
    with owned resource
      updates user resource
    without owned resource
      returns 403 (FAILED - 1)
ユーザーリソースのパーミッション組み立てロジックを変更します。otherはリクエストにおけるリソースオーナーが束縛されます。リソースオーナーは先ほど ApplicationController で実装した current_resource_ownerメソッドで変換されたアプリケーションのユーザーオブジェクトが束縛されているので、今回のアプリケーションだと User クラスのインスタンスです。
# app/models/user.rb
   def build_permissions(perms, other)
     perms.permits! :read
-    perms.permits! :write+    perms.permits! :write if self == other
   end
テストを実行してみます。
❯ bundle exec rspec spec/requests/users_spec.rb:24

users
  PUT /v1/users/:user_id
    without owned resource
      returns 403
    with owned resource
      updates user resource
JSON API のレスポンスのテストは RSpec2 では rspec-json_matcherを用いて、RSpec3 では composing-matchers を使用して記述します。テストによっては構造を検査するだけでなく、実際のレスポンスされた値を検査します。
RSpec2
  let(:post_structure) do
    {
      'id' => Integer,
      'title' => String,
      'body' => String,
      'published_at' => String
    }
  end

  describe 'GET /v1/posts/:post_id'do
    let!(:post) { create(:post, user: resource_owner) }

    it 'returns post resource'do
      get "/v1/posts/#{post.id}", params, env
      response.status.should == 200
      response.body.should be_json_as(post_structure)
    endend
RSpec3
  let(:post_structure) do
    {
      'id' => a_kind_of(Integer),
      'title' => a_kind_of(String),
      'body' => a_kind_of(String).or(a_nil_value),
      'published_at' => a_kind_of(String).or(a_nil_value)
    }
  end

  describe 'GET /v1/posts/:post_id'do
    let!(:post) { create(:post, user: resource_owner) }

    it 'returns post resource'do
      get "/v1/posts/#{post.id}", params, env
      expect(response).to have_http_status(200)
      expect(JSON(response.body)).to match(post_structure)
    endend
DebugExceptions
Rails はデフォルトの設定だと development 環境ではサーバーエラーが起きた場合、 ActionDispatch::DebugExceptionsがエラー情報を HTML でレスポンスします。JSON API 開発の文脈ではデバッグ用のエラーレスポンスも JSON のほうが都合が良いです。その場合 debug_exceptions_json gem を使います。エラー情報が JSON でレスポンスされるので、開発がしやすくなります。また、RSpec との連携機能があり、request spec の実行中にサーバーエラーが起きると RSpec のフォーマッタを利用してエラー情報をダンプしてくれます。
Failures:

  1) server error dump when client accepts application/json with exception raised responses error json
     Failure/Error: expect(response).to have_http_status(200)
       expected the response to have status code 200 but it was 500
     # ./spec/features/server_error_dump_spec.rb:21:in `block (4 levels) in <top (required)>'

     ServerErrorDump:
       exception class:
         HelloController::TestError
       message:
         test error
       short_backtrace:
         <backtrace is here>
APIドキュメント
Web API 開発の文脈では、API のドキュメントを提供しドキュメントを最新の状態にアップデートしておくことで開発中のコミュニケーションを効率化できます。
公式サイトに「aptly is a swiss army knife for Debian repository management」とあるように、aptly は多機能な apt リポジトリ管理用ツールです。外部リポジトリのミラー作成、ローカルリポジトリの作成、リポジトリのスナップショット作成、スナップショット同士のマージ、S3 への publish 等の機能があります。「swiss army knife」と謳ってるのは伊達ではなく、かなり多機能でツールの全体像がつかみにくいのですが、オフィシャルサイトの Overviewにわかりやすい図などがあるので、そちらを参照してください。
$  pod lib lint --only-errors

 -> ExamplePod (0.0.1)
    - WARN  | [source] Git SSH URLs will NOT work for people behind firewalls configured to only allow HTTP, therefore HTTPS is preferred.

ExamplePod passed validation.
$ pod lib lint --only-errors --sources='git@github.com:gfx/PrivateSpecsExample.git,https://github.com/CocoaPods/Specs'

 -> ExamplePod2 (0.0.2)
    - WARN  | [source] Git SSH URLs will NOT work for people behind firewalls configured to only allow HTTP, therefore HTTPS is preferred.
    - WARN  | [iOS] Unable to find a license file

ExamplePod2 passed validation.
これで通常通り検証ができました。 pod repo pushは検証のロジックがlintとは違うらしく、 --sourcesは不要です。
$ git tag 0.0.1 && git push origin 0.0.1
$ pod repo push --allow-warnings  myspecs *.podspec
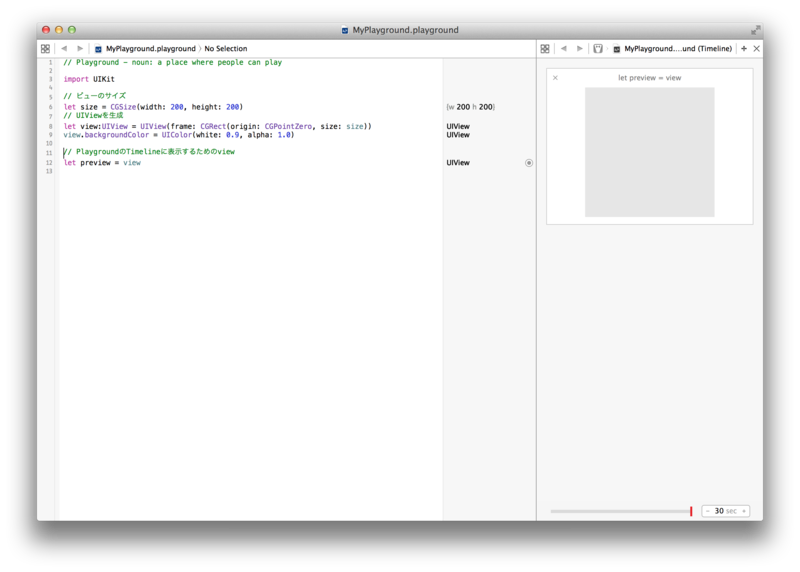
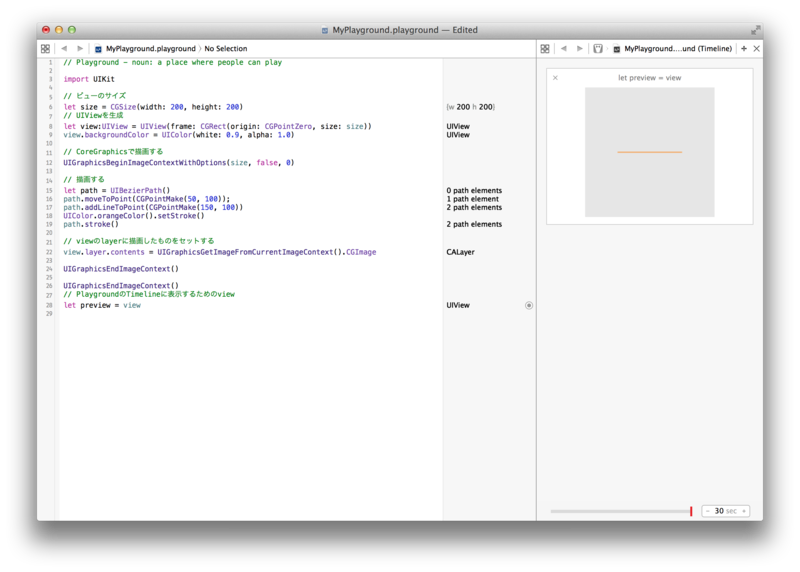
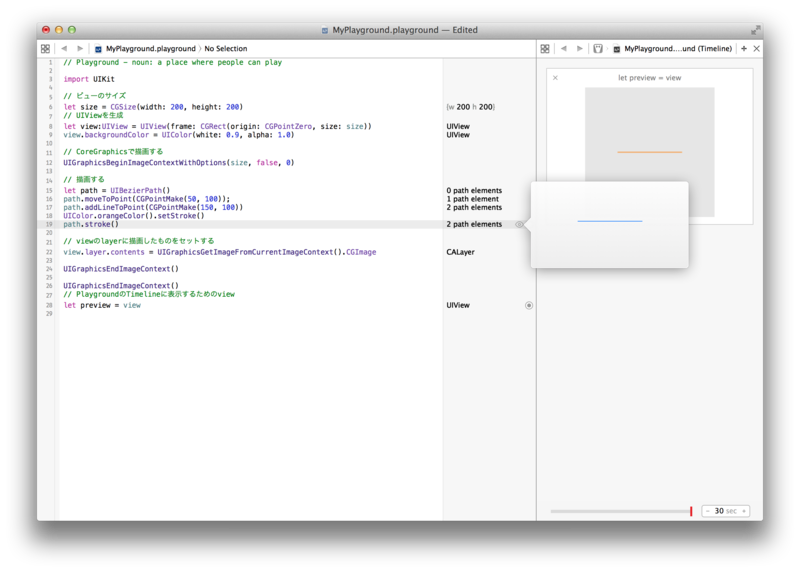
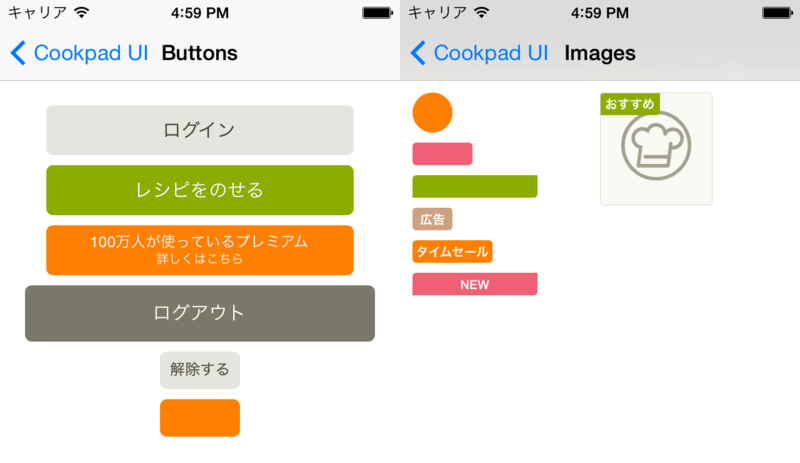
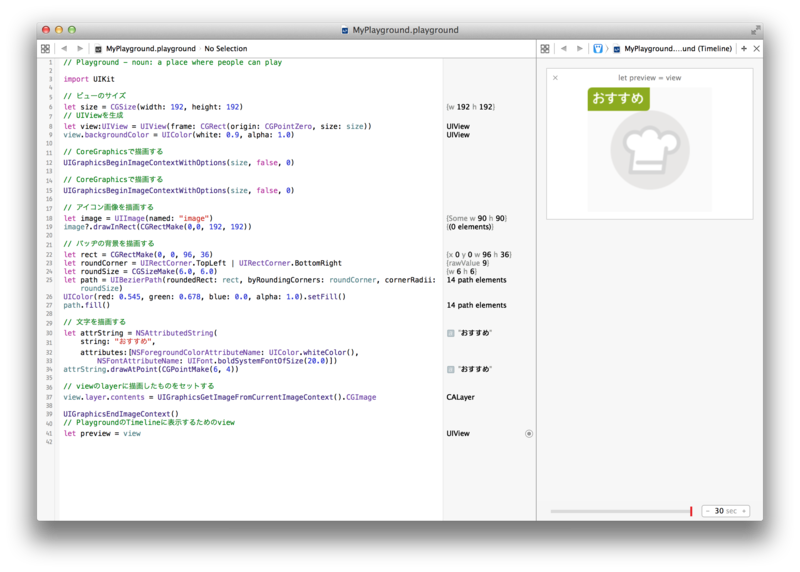
Image may be NSFW. Clik here to view.過去の記事 iOSアプリデザインリニューアルの舞台裏で記載していましたが、クックパッドアプリの中でもUIパーツの一部はコードで実装されています。
コード化することでわざわざ画像を用意しなくて済み、さまざまサイズにも柔軟に対応することができます。
require'rspec/json_matcher'require'infrataster/rspec'RSpec.configuration.include RSpec::JsonMatcherInfrataster::Server.define(
  :proxy,           # name'192.168.0.0/16', # proxy VM's IP addressvagrant: true# for vagrant VM
)
# spec/foo_spec.rbrequire'spec_helper'

describe server(:proxy) do
  describe http('http://foo.example.com') do
    it 'returns 200'do
      expect(response.status).to eq(200)
    endendend
まだnginxの設定を書いていないので、テストは失敗します。
$ bundle exec rspec
  1) server 'proxy' http 'http://foo.example.com' with {:params=>{}, :method=>:get, :headers=>{}} returns 200
     Failure/Error: expect(response.status).to eq(200)
     Faraday::ConnectionFailed:
       Connection refused - connect(2) for "192.168.33.10" port 80
--- a/spec/foo_spec.rb+++ b/spec/foo_spec.rb@@ -5,6 +5,12 @@ describe server(:proxy) do
     it 'returns 200' do
       expect(response.status).to eq(200)
     end
++    it 'proxies to app-001' do+      expect(response.body).to be_json_including({+        'X_MOCK_HOST' => 'app-001',+      })+    end
   end
 end
$ bundle exec rspec
server 'proxy'
  http 'http://foo.example.com' with {:params=>{}, :method=>:get, :headers=>{}}
    returns 200
    proxies to app-001

Finished in 0.01675 seconds
2 examples, 0 failures
--- a/spec/foo_spec.rb+++ b/spec/foo_spec.rb@@ -12,5 +12,11 @@ describe server(:proxy) do
       })
     end
   end
++  describe http('http://foo.example.com/isucon') do+    it 'returns Cache-Control header' do+      expect(response.headers['Cache-Control']).to eq('max-age=86400')+    end+  end
 end
$ bundle exec rspec
  1) server 'proxy' http 'http://foo.example.com/isucon' with {:params=>{}, :method=>:get, :headers=>{}} returns Cache-Control header
     Failure/Error: expect(response.headers['Cache-Control']).to eq('max-age=86400')

       expected: "max-age=86400"
            got: nil

       (compared using ==)
     # ./spec/foo_spec.rb:18:in `block (3 levels) in <top (required)>'
Obj-CとSwiftを同時に使う方法と、両者の相違点について書きました。この記事は、Using Swift with Cocoa and Objective-Cから気になった箇所を紹介させていただきました。
iBooks Storeで無料でダウンロードできるので、もしまだという方は1度目を通してみると良いかと思います。
複数のAndroidデバイスがコンピュータに接続されている時に、adbコマンドを使おうとするとmore than one device or emulatorというエラーメッセージが表示されますよね。
adb-pecoを使えば複数のデバイスが接続されている場合に端末を選択することができるので、あのメッセージを見てイラッとすることは二度とありません。


 Image may be NSFW.